Robotics with mBot #5

Follow-up of my previous articles (firstsecondthird, and fourth) about my experience hosting a robotic class in a junior high school. Here is a little wrap-up of the fifth session.

Theme of the day

This session was mostly a follow-up of the previous session. The idea was to continue working on the LED matrix and remote controls. Some of the kids were busy with another activity so we were only half of the usual troupe. So the session was much simpler to host!

Loops and Variables in Led Matrix

In the previous session, some kids started to draw animation in the Led Matrix. This time I tried to drive them to use “show drawing” at a specific position (x, y) using For loops and Variables so show the drawing at different positions (instead of drawing every single “frame” of their animation). That worked well for a couple of groups, which then could show it to other groups. The results were easy to demonstrate to other kids, so it was quite successful.

Common mistake

In the report of the session #3, I mentioned some common mistake that kids were doing (no looping, no waiting). Another one that comes over and over is that kids forget to come back to an initial state. For example, here is a typical program they would come up with:

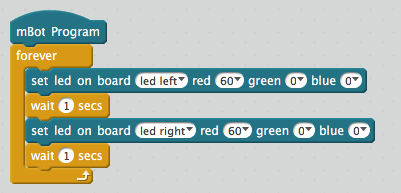
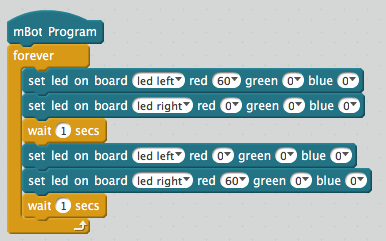
Their expectations is that the left LED will be red for 1 second, and then the right LED will be red for one second, and so on. So that should do a sort of an infinite right-left blinking. What happens in fact is that both LEDs quickly become red and stay red…. The program should set the LED back to their initial state if we want the blinking to happen:

This notion of “initial state” is also a source of many bugs when developing Led Matrix or mouvements programs. I guess they will lean by practise!


Robotics with mBot #4

Follow-up of my previous articles (firstsecond, and third) about my experience hosting a robotic class in a junior high school. Here is a little wrap-up of the fourth session.

Open Theme

For this session, I opened the activities in different directions by proposing new hardware to play with (remote control and led matrix) and leaving the groups full choices on what they wanted to program. The deal was let them build/program whatever they wanted and show it to the other groups at the end of next session. So this session was the first part of a double session.

Remote Controls

Kids have been asking to get the remote controls since the first session. I kept them until today because I was afraid that the class would quickly turn wild with kids driving their robot all around the room. Of course, that’s pretty much what happened! The first thing they had to do to use the remote control was to reset the program on the board to default one so that they could use the arrow to drive the robot. Then I told them they could reprogram each key of the remote. That caught their attention and most of the group seemed to enjoy triggering things with the remote (nicer than triggering by pushing the on-board button).

Led Matrix

Fixing the Led Matrix on the Robot was fun for all the groups because it was an opportunity to use again the screwdriver! Almost to quick and easy to do, but fun anyway. They the “draw on led matrix” action was very successful because it allows to draw your own custom image on the matrix. This feature is similar to the “draw sprite”one in Scratch using the Paint Editor.

Combo

Using both the remote control and the led matrix, several groups ended up this session with program showing different drawings on the matrix depending on the key pressed on the remote. Let’s see what they come up at the end of the next session.